Showing posts with label main. Show all posts

Monday, May 05, 2008

The Pressure's On

CRW_6793

Have I told you yet that Greg organized a chapter of the National Kickball league right here in New Haven? This was to be a summer of sports and outdoor recreation. We had plans, oh there were plans for fitness and getting in shape... well, poor guy, things don't always go as planned. Greg had a youtube-worthy moment this weekend, and it might have been worth it if only someone had a camera on them. I was working on Saturday so I did not get to witness the event myself, but, apparently, he made a spectacular swan dive towards the giant bouncing rubber ball in order to tag someone out. Unfortunately, by making this amazing save, he landed awkwardly on his side and broke his shoulder.

In case you ever break your shoulder, here's what to expect: horrible pain for the first seven days, an uncomfortable sling that rubs your skin raw, Vicodin, and no use of your arm for 6 weeks. This, and the ER doctor said that his was the slightest injury he could have made. (Better than dislocating a shoulder, apparently).

Greg has been a real trouper about the whole ordeal. There's not much he can do at the moment except watch movies and be uncomfortable on the couch. There's not much I can do for him, either, which makes me feel helpless. So I decided to make him something uber-healthy for Greg to eat on Sunday.

CRW_6792

I'm not really a "gadgetty" kind of kitchen person, but a friend of our's gifted us a pressure cooker recently. She passed it along with constant assurances that her husband makes spectacular tofu dishes using it. I haven't quite been able to duplicate the dish that she described (she said it becomes dense and spongey, with a texture akin to frozen tofu), but I have found this new kitchen appliance useful for cooking things rapidly. I've found that, in the last, final stages of cooking, when the grains are drying up and absorbing moisture from every source possible, the tofu can get a little drier and hole-ier.

CRW_6791

Pressure cooker tofu is nothing dramatic (for me, so far), but it the method I used to make this healthy salad is simple and the resulting dish is delicious and refreshing. The tofu has a wonderful texture that contrasts nicely with the wild rice, and the flavor creeps up on you: first nutty and grainy, then a burst of citrus flavor and olive oil. Next time I might add a little cilantro. Other possible additions? Toasted chopped walnuts, a little feta, pine nuts, or a squeeze of lemon juice.


Wild Rice Salad with Citrus and Tofu

What I liked better than the texture of this tofu (although that was good too) is the flavor. By cooking the tofu in the pressure cooker with orange juice, the citrus flavor thoroughly infused each cube of tofu. No weird sour/beany taste left.


Slice into 1/2" cubes:

1 package firm tofu

Add tofu to pressure cooker pot, along with

1 cup wild rice

1 cup orange juice

1.5 cups water

A glug of olive oil

Fit the lid onto the pressure cooker, turn the stove to high, and wait for the steam valve to open. Lower the burner so that the pot emits steam in steady spurts (~medium heat), and cook for ~15-18 minutes. (Keep an ear out and nose out for the sounds and smell of a dry pot/burning rice. Better to stop the pressure cooker sooner and finish the rice on the stove if need be). Meanwhile, wash and slice:

1 bunch beet greens (substitute spinach or arugula)

Peel and slice into 1/4" cubes:

2 oranges (I used one Valencia Orange and one Blood Orange)

When the pressure cooker is done, release the steam valve. Let  the rice and tofu cool for a minute (taste the rice; if it doesn't seem done, continue cooking on low heat). In a separate pot, steam the greens until wilted (~5-7 minutes) then shock in a bowl of ice water. Squeeze out the excess water and chop finely. Whisk together:

1 tbsp honey

1 tbsp cider vinegar

1 tbsp olive oil

1/2 cup orange juice

1/2 tsp ground sea salt

1/4 tsp freshly ground black pepper

Add the dressing, along with the greens and orange slices to the tofu and rice. Toss together and adjust seasoning if necessary.

Saturday, April 26, 2008

Leftovers Three Ways. Way #2: Roasted Vegetable and Grain Enchiladas


I've gotta say, after trying this recipe, I may never again pay $5 for fake meat based on TVP, tofu, or weird fungi. This was good. And natural. And cheap. And it used up these leftovers.


I'm not actually a fan of fake meat. I'd usually rather have vegetables, or occasionally have the real thing. Yet every once and a while, the craving for nachos or meatballs hits me, and I just find myself not wanting to spend $15 for a bowl of free range chili (for that price, I'll take the ribs).


This does the trick and it's all natural and homemade. This time, I used a pre-mixed taco seasoning for flavor (I wanted something salty!). Next time, I'd keep things simple to let the vegetable flavor shine through. I could imagine a variety of light seasonings: a little lemon juice, salt and pepper, maybe a little sage or coriander, cayenne, chili powder, or curry powder. I absolutely loved what the ground up pecans did to this dish. Greg is allergic to walnuts, but I imagine those would work just as well. Next time I'll up it to a full cup of nuts, and I'll toast them beforehand. I also happened to toss in some of the braised tofu as well, although I'm not sure that it added anything, so I left tofu out of this recipe.


Roasted Vegetable and Grain Enchiladas

Serves 2-4


Substitute any vegetables and any grain (except white rice, which might get mushy...) and any nuts you wish. Toasting the nuts before hand might be tasty. This particular set of roasted veggies included carrots, zucchini, asparagus and green peas - but of course, anything would work quite well. You could assemble the filling ahead of time.


In a blender or cuisenart, puree, or finely chop by hand:

~1 cup mixed roasted vegetables and Quinoa

1 egg

Generous 1/2 cup pecans

In a medium bowl, combine the veggie/grain mixture with:

Another 1/2 cup roasted vegetables and Quinoa

Seasonings of choice

Set aside the veggie/grain mixture. Chop:

1/2 sweet onion

1 red pepper

To a large fry pan, add:

1 tbsp olive oil

and saute the onions and peppers on medium-high heat until soft (~10 minutes). Add the veggie/grain mixture and continue sauteeing until cooked through (~10 minutes). Add a splash of olive oil to the bottom of  a large casserole dish and assemble the enchiladas with:

6 10-12" flour tortillas

Add ~1/3 cup enchilada filling to each tortilla. Wrap the tortilla around the filling and place, seam side down, in casserole dish. Once assembled, pour over the top of the enchiladas:

1 cup simple red salsa, with a few shots of hot sauce if you wish

1/4 cup chopped pickled jalepenos or green chilis

Bake at 350 degrees for 40 minutes, or until everything is bubbling. Sprinkle over the top of the enchiladas:

1 cup grated cheese

1/4 cup chopped cilantro

Bake for another 10 minutes, or until the cheese is bubbly. Serve with sour cream. and extra salsa.

Thursday, April 24, 2008

Leftovers Three Ways. Way #1: Roasted Vegetablesand Quinoa Soup

Passover is a symbolic and ritualistic event. The Passover seder and subsequent meal includes many different foods - all of which have meaning. Among other traditions, Passover should include roasted meat (to commemorate the lamb blood that the Jewish slaves smeared over their doors), fresh peas or other springtime vegetables (renewal), and, of course, no wheat is permitted (to remind ourselves that upon escape, the Jewish slaves were not able to wait for their bread dough to rise, or, to remind ourselves that the Jewish slaves ate poor, unenriched bread, depending on your tradition).

Since our house is mostly veggie, I chose to roast springtime vegetables (asparagus, peas, carrots, zucchini), braise tofu, and serve it all over quinoa drizzled with olive oil and seasoned with salt and pepper.

This Passover was a sad event for me. I was rushing through an animal experiment whose timing was out of my control; it could not be postponed no matter what. I spent my entire weekend in lab, hunched over a bench-top with a sterile mask covering my mouth so that I could do something that I hate and find engrossing all at the same time: do brain surgery on 40 rats. For a cultural holiday designed to make you aware of the how you are enslaved in your own life - and remind you that your ancestors have, on more than one occasion, escaped from what opressed them, and that cultures (and animals) across the world experience slavery even today- this was a travesty. I felt terrible. I was both the one doing the enslaving and feeling enslaved. I felt denied the one yearly event that is important to me.

Yet, somehow it all worked. I finished my surgeries at 5pm on Sunday and raced home to assemble a small seder dinner by 7pm. Greg, myself, my officemate Audrey (who had never been to a seder before), and our Jewish friend Josh sat down to a lovely evening where we swapped stories of religion, discussed the symbolic importance of everything we ate, and had more than a glass of wine or two.

When we finished our meal, there was enough leftover roasted vegetables and quinoa (among other dishes!) to feed a small army. I used these roasted vegetables in three ways this week, and I thought I'd share the ideas with you. These are, of course, all very loose recipes.

Roasted Vegetable and Quinoa Soup

Serves 4

Certainly this recipe calls for improvisation. This is a kitchen soup sort of soup! What I like best is the contrasting flavor of lemon and Quinoa

Combine the following ingredients in a medium sized soup pot:

2 cups mixed ratio of roasted vegetables and Quinoa, with tofu if you prefer

4 cups good vegetable stock

2 cups water

Cover, turn the heat to medium and simmer for 15-20 minutes, or until the stock thickens slightly. Add

The juice of half a lemon (or, lemon juice to taste)

Sprinkle with

A handful of chopped cilantro

And serve!

Sunday, April 13, 2008

Some things are just primal

Look what I did:

CRW_6735 copy

My first ribs in 7 years, and they were outstandingly, mouth-wateringly spectacular. I remember enough of my last rib sampling to know that these ribs were worth the high premium ($2.50 a rib bone!) for more than just the relatively happy pasture-based life that my extra dollars afforded this animal - they were also complex in flavor with well distributed fat. There wasn't a speck of gristle on this rack.

CRW_6725 copy

The slow roast in the oven idea comes straight from Greg's dad (thanks, Jim). The ribs are liberally seasoned, placed over a rack of simmering water in the oven and slowly steamed over the course of the afternoon. The salt acts as a brine (keeping moisture in). The longer the ribs steam, the more tender and fall-off-the-bone the meat becomes. In the last 20 minutes of cooking, the ribs are placed on a low fire grill and basted several times with barbeque sauce. This last step on the grill built up a mouth watering crust of savory, sweet, tangy barbeque sauce. These ribs were, in a word: awesome. There are some human activities, like pulling melt-in-your-mouth roasted meat off the bone, that are just so primal, and...I want more.

CRW_6722 copy

Awesome Pork Ribs

I chose a very simple dry rub and used store bought barbeque sauce (I used "Bone Sucking Sauce" brand - I couldn't not try it, with that title - watch out, the link has music). You could put anything in the rub you like, so long as there is a good amount of salt in the first step. I'm not sure if a one hour brine actually tenderizes, but I found warnings, online, that brining overnight "might" make the meat too salty - so, extend the brining time at your own risk.

Combine the ingredients for the dry rub:

1 tbsp sea salt or kosher salt

1 tsp celery salt

1 tsp cayenne pepper

1 tsp black pepper

2 tsp garlic powder

Rinse:

4-5 lb humanely raised pork ribs, ~2 servings (trimmed of fat if necessary - mine did not require this step)

in cool water and drain for a moment. Place the ribs in a deep baking dish and rub with seasonings. Cover and store in the refrigerator for at least an hour or up to several hours. Meanwhile, preheat the oven to 250 degrees. Remove the ribs from the fridge and place them on a grate or cooling rack. Cover the bottom of the roasting pan in silver foil and place the grate or rack with the ribs on top. Form a tent out of aluminum foil and place in the oven. Pour in:

3 cups water

After the first hour, remove the ribs with tongs onto a plate or cutting board. Smear both sides liberally with

3-5 tbsp mustard

Continue cooking, turning the ribs every hour, for 3-4 hours. You can cook the ribs for up to 6-7 hours, so long as the heat is low and you keep an eye on them. Make sure the internal temperature has reached at least 160 degrees (but don't stop there! the ribs get tender from prolonged cooking). Get the grill preheated to medium-low heat and place

1 cup good barbeque sauce

in a small dish. Transfer the ribs to the grill and baste each side. Grill on low or medium heat, basting every 5 minutes, for about 20 minutes, or until a good thick barbeque crust has formed. If necessary, turn the flame up to high for a moment to char the meat - but make sure to keep an eye on it so that it won't burn. Serve and enjoy!

CRW_6732 copy

Sunday, January 27, 2008

Wild What

bCRW_6230

I have a confession to make. When I deviate from my mostly vegetarian palette... when I indulge in what I try to be sure is humane, ecologically raised food... when I find myself wanting some meat... I want... well, meat. I mean real meat, powerful, chewy, flavorful meat. Don't give me any of that chicken breast white crap: I want bacon, chicken thighs, or wild boar.

Wild Boar? What?

No, seriously, it's pretty much my new best friend. Let me list the reasons:

(1) My primary concern in choosing what I eat is sustainability. Wild Boar are sometimes Feral Pigs, which exist in annoying, pest-like abundance - reducing the local population of feral animals does the environment, relatively speaking, a favor. Even when "farm-raised", Boar primarily forage for food and are generally raised with less grain than pigs or cattle. This species can be farmed on a much smaller ecological footprint and with fewer antibiotics than grain-fed animals. So, whether the Wild Boar is obtained from a local feral pig population or is raised on a large acerage farm, I feel good making a choice to minimize any ecological impact.

(2) My second concern in choosing what I eat is to ensure fair animal husbandry. Not all Wild Boar is "Wild", but truly free-roaming meat can be located quite easily. I eat it happily: these animals have a good life nosing around in the forest for mushrooms and other edibles.

(3) My third concern in choosing what I eat is based on health. The health benefits of eating wild game meat are well documented (akin to eating grass fed versus grain fed beef)

(4) Although chicken, pork or fish are occasionally on our menu, Greg and I will probably never eat beef. When your husband knows some who died from CJD, it kind of turns you off of the whole species, at least until America starts testing its animals. Wild boar fills my otherwise unfillable craving for red meat.

(5) Wild Boar is flavorful and delicious.

(6) My local market carries a steady supply from this fantastic company.

(7) It's the sort of thing that would make Michael Pollan proud.

CRW_6236

Prepared well, the Wild Boar I've had has been very flavorful and tender. The last time I tasted some at a restaurant, it literally fell apart on the fork. The prepared sausages we've been eating at home have a wonderfully delicate texture and a hearty, beef-like flavor. So, we decided it was time to try making a boar roast ourselves.
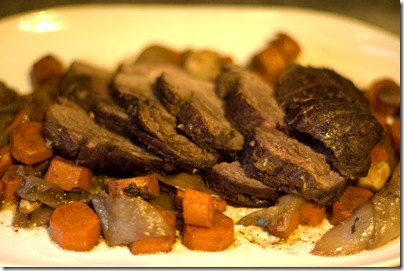
CRW_6244

When I searched for a good guide on cooking wild boar, I quickly came up short. There actually aren't many recipes on the internet and many of the recipes I found did not distinguish between different cuts of meat. The dinner I worked on tonight was my best shot at uniting all of the advice I read: marinating, slow cooking, pairing with complementary flavors and textures.
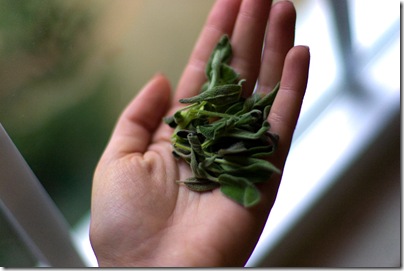
CRW_6234

So, how'd everything go? Well, okay, the Wild Boar Roast was dry. Very dry. Bone dry. Chewy, actually. The wild mushroom pan sauce was the true star of the show: it was out of this world for "savory". The Boar pan drippings lent a meaty flavor to the mushrooms that I know I could never achieve with just wine and salt alone, and the last bit of butter emulsified everything into satiny goodness. I could have licked the pan - it was that good. As for the meat, the texture left much to be desired, but we devoured it anyway since the flavor was spot on. The red wine and sage complemented the rich, wild flavor of the Boar wonderfully. I wouldn't change the flavors of this dish, only the cooking method. Here are a few guesses for next time:

- Choose a different cut (although, the "mini-roast" available at my local market is dirt cheap and I'm not sure I want to spend, say, $60)

- Cook the meat longer (akin to brisket)

- Marinate longer (some recipes suggest up to five days)

- Marinate with something other than red wine (eg vinegar)

- Create more surface area for the meat to be exposed to the pan sauce while cooking (eg a ragu or bolognese)

In the meantime, if you're curious about Boar but don't want any hassle, these sausages are amazing.
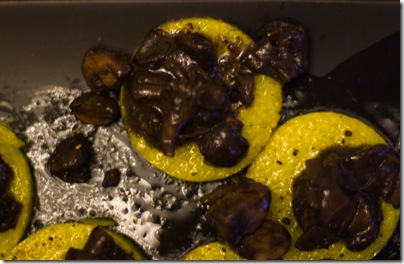
CRW_6251

I know these mushrooms and polenta circles look awful, but oh my gosh it was delicious. So flavorful.

Wild Boar Roast with Wild Mushrooms and Polenta

1 Wild Boar roast, 1-1.5lb (for example)

2 tbsp olive oil

2 cups Red Bordeaux, or other hearty wine (more examples)

1 med onion

3-4 med carrots

6-8 cloves garlic

~2 tsp chopped fresh sage or 3/4 tsp dried sage)

12 oz cremini or baby bella mushrooms

4 oz wild mushrooms of choice(eg, Maitake, AKA Hen of the Woods)

2 tbsp butter

Extra Olive Oil

Polenta***

Add the roast and 1 cup of red wine to a plastic ziptop bag. Press out all of the air, seal the bag, and marinate for 6-8 hours in the refrigerator.*

About 3 hours before dinner, preheat the oven to 275 degrees. Cut the onion in half and cut each half in 4 wedges. Peel and slice the carrots into 1/4" medallions. Peel the garlic and leave whole. Set the vegetables aside. Slice off the woody ends of the stems, then halve or quarter the cremini or bella mushrooms so that they're all of similar size. Roughly chop the wild mushrooms. Set the mushrooms aside.

Add all of the olive oil to a cast iron dutch oven or heavy bottom casserole dish. Bring to medium high heat. Carefully place the roast into the pan: it's going to sizzle quite a bit. Brown the roast for 1-2 minutes per side. Make sure the roast gets a nice color on each side. And by "side", I mean all sides: at least four turns around plus two ends.

Once the roast is evenly browned, add the vegetables and cover with a good quantity of freshly ground pepper. Sprinkle 1/2 tsp of salt on top. Cover the dutch oven and place in a 275 degree oven. Baste every 30 minutes, turning the roast, until the internal temperature reaches 170 degrees** and the vegetables are cooked through. (Add the sage right at the end).

Slice cold polenta to 1/2" thick circles, place on a cookie sheet and brush with olive oil. Sprinkle with freshly grated black pepper. When the roast is cooked, remove the casserole dish and bring the oven temperature up to 350. Place the polenta circles in the oven and cook until lightly browned and soft throughout, ~20 minutes.

Meanwhile, remove the cooked vegetables and roast to a platter, covering with silver foil and a towel to keep warm. Reserve the pan drippings and juice in the dutch oven. Add the mushrooms to this broth. Cook over medium heat with the lid off, stirring often, until the mushrooms begin to caramelize and the liquid is almost completely reduced (~10 minutes). Deglaze with an additional cup of red wine and repeat the process (~10 minutes). When about 1/2 cup of juice is left, turn off the heat and stir in 2 tbsp butter. Salt to taste.

Slice the roast as desired. Plate the roast with several polenta rounds on the side. Drizzle the mushroom glaze over the polenta rounds and spoon other vegetables and mushrooms on the side. Enjoy with a glass of the same wine you used to cook the boar. This dish goes well with plain Great Northern beans (recipe below).

*As I mentioned above, I probably should have marinated for longer

**Don't do what I did. The roast was in the oven for an hour and I basted it for the second time. The juices were bubbling. Out of curiosity, I took a spoon and sampled the basting liquid. It tasted horribly raw but for some reason I didn't spit it out. I checked the temperature of the liquid, which was only 140 degrees (a far cry from the required 170), and then proceeded to freak out. I am hoping that this particular boar haunch didn't host any parasites, or maybe they stay put in the meat and don't flow out into the juices. In any event, I did two shots of rum for good measure! I wanted to tell this story because some websites - D'Artagnan included - tell you that Boar is best cooked rare (like beef) and suggest a low temperature of 120. Personally (and I certainly could be wrong), I think this is a terrible idea, since foraging animals are fairly likely to pick up parasites such as these. Phrases like "burrow through the wall of your small intestine" come to mind. The only way to be safe is to cook the boar thoroughly. So, 170 degrees might worsen the toughness of the meat, but I would recommend it.

***You can make your own and cool it into a solid shape, or avoid the extra hassle and buy the tube:

CRW_6241

Great Northern Beans, quick method

These creamy beans are flavorful enough to hold their own without extra seasoning.

1 cup Great Northern Beans, rinsed and picked over

3 cups water or broth

salt to taste

Add beans to a pot and cover with 3" of water. Cover the pot, bring to a boil and then turn off the heat. Let stand for one hour. Empty out water and rinse beans thoroughly.

Place beans back in the pot with the 3 cups of water or broth. Bring to a simmer, cover, and cook until the beans are creamy (~1 hour, depending on how old the beans are). If the beans are at all gritty or grainy, keep cooking! Salt to taste.

Friday, December 28, 2007

A Lentil Soup You Won't Soon Forget

CRW_6059

Recipe for homemade bread to serve it this lentil soup with

In Tempe Arizona, off University Drive, sharing a plaza with a dry-cleaners, an ethiopian diner and an abandoned bank dusty, sits a yellow stuccoed cafe whose inner ceiling is strung with ivy that flourishes all year round. I visited there at least several times a month when I lived nearby, and I was almost always served by the same waiter - a curiously blue-eyed, sandy-haired 20-something man who tended to follow my friendly inquiries with some religious musing or a cryptic smile. One could never be certain if he was chemically high or spiritually high. Either way, the effect never failed to make me smile back. The restaurant was a family owned and operated Israeli Cafe called Sabuddy's, and they served The Best Lentil Soup I've ever had.

Why was it so good? At the time, I wouldn't have been able to tell you, exactly. It was thick, hearty, nourishing, and possibly umami-laden. The only identifiable components were lentils, white pepper and some potato, though its exact composition depended on the day. Its consistency varied from watery to stand-a-fork-upright, but it was always amazingly creamy and filling with a bright, yellowish color and flecks of pale white lentil skin. My friends and I never managed to get an exact recipe out of our spiritually enlightened waiter, except to confirm on more than one occasion that the soup was vegan.

CRW_6054

Since moving away from Sabuddy's lentil soup, I have tried on many, many occasions to duplicate it. A friend and I wondered - what was the secret ingredient? Was there some vegetable or seasoning we knew nothing about? MSG? Did they sneak bacon, or maybe chicken stock in it? Some illegal drug that kept us coming back? We tried everything we could think of, except the problem was there that there wasn't much to try save carrots, celery, potato, and spices. Homemade lentil soup was never the same as what was served at Sabuddy's.

That is, homemade lentil soup was never the same until I discovered these:

bCRW_6039

It was the type of lentils that made the difference, and my eyes were suddenly open to a world of flavor.

What do you think of when someone says "lentil" to you? The typical brown and green varieties are a bit bland - filling, yes, but lacking in any culinary oomph or interest on their own. When I started learning more about this often overlooked legume, I was surprised to find a diversity of form and flavor that is not properly appreciated in American cuisine. Lentils have been around for more than 9,000 years. Although often considered peasant food, lentils have endured in a variety of cuisines in the Near East, India and the Mediterranean - probably because of their remarkable flavor, excellent nutritional value and ease of preparation. Pair lentils with a grain and you will be providing your body with a complete set of essential amino acids - good for vegetarians. This dream dictionary claims that if a young girl dreams of lentils, she is dissatisfied with her lover, though I might take a less Freudian approach to the matter. I was also amused to find out that in the Old Testament, Esau gave up his birthright to Jacob for a bowl of lentil soup - perhaps my biblically inclined waiter was hinting at more than my agnostic (and recipe-inquiring) mind could appreciate.

bCRW_6040

Today, I decided to try experiment with the several kinds of lentils sitting in my pantry. The cooking technique for lentils is quite straightforward: rinse lentils in four changes of water prior to cooking, do not soak, and do not salt or add acidic ingredients until you are ready to serve the dish (both of which would toughen the lentils). Cooking times will vary, and you can choose to halt the cooking process earlier to drain water and retain the lentil shape, or you can boil them down into a creamy stew. As with any legume, skimming foam off the top of the boiling water and cooking them thoroughly will help make them easier to digest. Here are four different types of lentils all prepared the same way:

Type

Color

Flavor/
Texture

Lentil :
water ratio

For intact lentils

For
softer lentils

Brown / Common Think army fatigues Mild, watery

Firm, holds shape
1:3 30 min* >60 min
Harvest Gold

Yellow Hearty, nutty

Very soft
1:2.5 15 min >30 min*
Petite Crimson / Egyptian

Red, hulled and split Hearty, meaty

Mush
1:2.5 10 min >30 min*
Beluga / Black /
Urad
Black Fruity and fragrant, sweet

Very firm, holds shape well, glossy
1:3 30 min* >60 min*

*Lentil is best suited for this texture

bCRW_6046_1

bCRW_6045_1

bCRW_6047_1

bCRW_6049

CRW_6053

Note: Older lentils require more water and longer cooking times. These are my very-approximate estimates based on the particular packages of lentils I had. Stir and taste often, adding more cooking liquid as necessary. Thoroughly cooked lentils will be creamy through the entire bite.

And here is, as best as I can duplicate it, Sabuddy's lentil soup. I suspect their version could be even easier to prepare than mine.

Sabuddy-Style, The Best Lentil Soup

Serves: well, that depends on how hungry you are. About two.

2 tbsp olive oil

1 small onion, diced

1 tsp coriander, 1 tsp white pepper

2-4 garlic cloves, minced

1 cup petite crimson "red" lentils, rinsed thoroughly and picked over*

2-3 cups water or stock (I'd actually avoid vegetable stock here - use free-range, organic chicken stock if you have it, or else just water)

1 small Russet potato, cubed to 1/2"

Salt and black pepper to taste

A lemon wedge, if you so desire

*If you can't find red or yellow lentils (check the bulk food section of natural groceries) you might be stuck. Green / brown / black / French lentils will simply not work in this recipe.

Heat the olive oil in a soup pot until it shimmers. Turn heat to medium and add onion, coriander and white pepper to the pot. Cook, stirring, until the onion is translucent. Turn heat to medium-low and add garlic, lentils, water or stock and potatoes. Cover and simmer for 45-60 minutes, stirring often as the soup thickens.

The lentils will soften and completely break down to the point where it looks like you pureed the whole thing in a blender; then, the soup is done. Add extra water or stock if necessary and don't be afraid to cook the soup for longer than stated here: the final soup will have the consistency of a smooth, thin porridge and it will be very creamy. It will thicken as it cools.

Salt and pepper to taste. Serve with good bread and a squeeze of lemon juice.

bCRW_6044

Notice the powdery stuff on the yellow lentils? That's talc - part of the reason why you need to wash lentils very thoroughly

Friday, December 21, 2007

Toasted Bulgur Wheat


  bCRW_5999

Bulgur is prepared by parboiling, drying and grinding whole wheat berries. This nutty grain is my go-to recipe for potlucks or dinner parties. Bulgur, in my mind, is a wonder-grain for vegetarians. It's not packed in amino acids like Quinoa, but what it lacks in protein, it makes up for in flavor. Once toasted with oil in a pan, the wheat grains release a wonderful nutty flavor that complements roasted vegetables quite well. The fact that most people haven't had bulgur makes this dish a pleasant surprise.

As an added bonus? Leftover bulgur tastes even better the next day.

bCRW_5997_1 bCRW_5998

The recipe I have listed here is quite time consuming. I don't always invest an entire afternoon to prepare bulgur wheat; in fact, for most dinners, I whip something together in less than 30 minutes by skipping the roasted vegetables (I stir in a little chopped onion or parsley instead).  Toasted bulgur on its own is amazing. You can also substitute whatever is in your pantry - I have made this with cauliflower, broccoli, asparagus, onion, garlic, tomatoes, zucchini, carrots, mushrooms of all sorts, and squash. If you wish, you could stir in chopped nuts, feta, parsley or roasted garlic at the end. It will taste like winter comfort food no matter what, I promise.

To shorten this recipe, you can chop, toss and roast all of the vegetables together at once. Doing them in batches didn't bother me since I was cleaning while I cooked, but if you're in a rush, just roast everything on several pans all at once. Keep an eye on things to make sure the vegetables don't burn. When you substitute other vegetables, note that denser vegetables (eg, carrot) will take more time and thus need to be chopped smaller than watery vegetables (eg, zucchini).

bCRW_6002

Roasted Vegetables with Toasted Bulgur Wheat

Serves: 10-12


Lots of olive oil

Salt and Pepper


1 head cauliflower

1 bunch asparagus

1 small eggplant

1 medium zucchini

1 onion

4 medium portobella mushrooms


2 cups bulgur wheat, medium-course grind

4 cups water or stock*

1 tsp salt, 1 tsp freshly ground black pepper, 1/2 tsp cayenne pepper, 1 1/2 tsp ground sage


Preheat the oven to 350.  Prepare and roast the vegetables in four batches. While roasting one set, prepare the next set of ingredients, tossing each with plenty of olive oil, salt and pepper before its time in the oven.  While roasting vegetables, be sure to stir often so that they do not burn. (1) Peel any green leaves off of the cauliflower and slice into 3/4" sheets. Remove tough part of main stem, if there's any of it left, and then chop or pull apart cauliflower florets until everything is bite sized. Toss with liberal amount of olive oil and salt and pepper, pour into a large baking dish or cookie pans and roast until tender and browned on the edges (~45 minutes, depending). (2) Hold a test piece of asparagus by each end and bend until it snaps. Using the length of this stalk as a guide, trim the rest of the asparagus to the right length. Roast for ~15 minutes. (3) Peel and cube (1/2") the eggplant; salt excessively and leave in a colander for 20 minutes, then rinse off the salt and squeeze out all the water you can.  Chop or slice the zucchini into 1/2" thick pieces. Dive the onion. Roast all of these together for ~25 minutes. (4) Slice the portobellas to 1/4" thickness. Roast for ~10 minutes. When you're done, reserve any pan drippings and add to the bulgur.


At some point in this process, prepare the bulgur. It can sit without getting mushy. Add 4 tbsp olive oil to a large, heavy bottom pan. Add bulgur and cook over medium-high heat, stirring frequently until the bulgur is toasted to a deep honey-brown color. Don't burn it, but get close! Add all of the vegetable stock and spices at once, cover, and simmer over medium-low for 20-30 minutes. Check often, as the cooking time will depend on what kind of bulgur you use. When done, the bulgur should taste nutty; it will be mostly tender with some al dente pieces, but it should not "stick to your molars", as my husband puts it. If the bulgur starts getting dry, just stir in more stock 1/2 cup at a time. Salt and pepper to taste.


Spoon bulgur into a large casserole dish and cover decoratively with vegetables. Keep warm in oven until ready to serve or cool for at least an hour before placing in the fridge. This casserole will taste even better if it sits overnight.

* You can use water, chicken stock or vegetable stock for this. I use homemade vegetable stock (recipe below). If you don't want to bother with a homemade stock, look for a stock that is mostly clear (not a "broth" of pureed vegetables), and look for something with a slightly bitter, rich flavor to it. After much trial and error, I found that I prefer this stock, whose first ingredient is onion. Depending on where I shop in a particular week, I use this one too. My pet-peeve is carrot and tomato based stocks or broth purees, which are far too sweet for most vegetable dishes.  I honestly think a good stock (whichever one you use) makes a world of difference.


bCRW_6000

Vegetable Stock

This takes somewhere around 1 lb of vegetable scraps: onion skin peelings, the ends of carrots, mushroom stems, garlic ends, tomato bits, parsley, etc. I even throw in kale stems or spinach leaves if I have it. Avoid sulpherous vegetables like cauliflower, cabbage or broccoli. If you don't have any mushroom stems, sprinkle in a few dry mushrooms to compensate - it really makes a difference. If the vegetable scraps look low, I supplement with a chopped carrot / onion / celery, etc. Taste the broth after about an hour and decide if it seems too watery.


Add vegetable scraps to a large pot with 1 bay leaf, a palm-full of peppercorns, and 1 1/2 tbsp salt. Add water to cover vegetables completely (8-10 cups), cover, and simmer on high heat for 3 hours.  Cool for 1 hour or, if you live in the east like us, on a clean shelf in the pantry/mud-room /garage below 40 degrees overnight!


Line a colander with paper towels or cheese cloth and set over another pot or large mixing bowl. Pour stock into colander and drain, squeezing any extra broth from the vegetables as you go. Pour into a clean container and use within several days.


Wednesday, December 05, 2007

Eat your vegetables

bCRW_5922

7 years ago, when I first started my vegetarian ways, I started learning how to cook. I wanted things a certain way, with certain ingredients, in a certain amount of time with a certain cost. Sometimes those wishes are hard to fulfil all at once. Sometimes, what I succeed with in the ingredient list fails miserably in flavor. Sometimes? I'm just too damn picky. Nowadays I can usually see a train wreck coming. But sometimes, I expect a recipe to go very, very wrong, and I make it anyways.

bCRW_5940 bCRW_5939

Tonight's dinner was a lofty goal. It was to be comfort food, a dairy-free lasagna, and it and couldn't involve tofu, nuts or tomato sauce. I wanted to the first thing because it's below 30 outside. I wanted the second thing because, well, otherwise I'd regret it. And I wanted the third thing... just because I was feeling picky. I also needed to use up a pound of mushrooms. I mean, aren't they cute? Though, seriously folks, please wash your mushrooms. It might be pasteurized manure, but it's still manure! Flavor be damned - I choose not to knowingly eat dirt.

Er, anyway, traditional lasagna relies on a Bechemel sauce to add moisture between layers. It's a clever trick, because the creamy fat in the bechemel tames and binds together the other flavors without stealing the show itself. For a while now, I've been imagining a dairy-free lasagna that utilizes a Veloute sauce instead of a Bechemel. They both start with a roux (equal volume flour and fat - aka butter - cooked together); to make a Bechemel, add milk, and to make a Veloute, add stock. The Veloute would have a heartier but sharper flavor than a Bechemel would.

bCRW_5935 bCRW_5938

I struggled with the mushroom part. It's easy to overpower or cover up a mushroom flavor; it is harder to balance it, especially without cheese. Here, I used half of the Veloute for layering with mushrooms, and I pureed the other half with an equal volume of frozen peas. I reduced the puree on the stove, to give the lasagna a bit of structure, and assembled the whole thing with no-bake noodles.

bCRW_5945

I know: mushrooms, peas and no-bake noodles. You're expecting this to bomb, too, right? In fact, until the first bite, I assumed it had bombed. And then I took a taste of melt-in-my-mouth goodness: balanced, filling, structured, flavorful, all of it, this lasagna rocked. Greg, who is often skeptical of my vegan-style or dairy-free creations, raved. He called it Steak Lastunia. Meaty like a steak. Looks like a lasagna. Fills ya' up like a stew. Inventive name, no?

bCRW_5960 bCRW_5959

The whole thing wasn't super photogenic, but it actually looks lovely, delicate and very green in person. Served with a good salad and a grain or lentil based side, this is definite dinner-party material.

bCRW_5962

Okay, like, I just got up (at 11pm) and had a second helping. Greg says it was my third. Oh that's good.

Mushroom Lasagna with Pureed Peas

Serves: 4, if you have willpower

Ingredients:

About 1 pound assorted mushrooms, sliced to 1/4" *

1 small onion, chopped (~1/2 cup)

8 no-bake Barilla lasagna noodles**

3 cups stock

4 tbsp butter***

4 tbsp flour

1.5 cups frozen peas

1 tsp oregano

2 tbsp chopped flat leaf parsley

Salt and Pepper

*I used 2 medium portabella's, about 10 oz baby bellas, and several oz shitakes. The one pound total was already sliced and minus the stems (the portabella stems miraculously disappeared when I turned my back - err, Tori - and shitake stems aren't very good to eat)

**Or however many will make 4 layers in an 8x8" pan

***I could taste the butter in the final dish. If you want to go with less fat, reduce this to 2-3 tbsp and just cook the roux a little more carefully. It'll thicken the same.

  1. Preheat oven to 350F.
  2. Add 2 tbsp olive oil to large pan over medium-high heat. Add mushrooms and cook, stirring occasionally, until the mushrooms start to caramelize (about 10 minutes). Add onion and cook until translucent (~5 minutes)
  3. Meanwhile, melt butter in a saucier on medium heat. Whisk in flour until smooth, and cook the roux to a light, nutty brown color, whisking occasionally (5-10 minutes).
  4. Add stock to the cooked roux 1/2 cup at a time, whisking thoroughly between each step to prevent lumps.
  5. Splash the last tablespoon or so of stock into the mushroom pan to deglaze (scrape up the bottom to get all of the good bits).
  6. Reserve 1.5 cups of Veloute. Add peas to remaining sauce. Puree in the pan with an immersion blender or a transfer to a blender/food processor for this step and return to saucier. Cook over medium-high heat until the puree has reduced by ~1/2 (10-15 minutes).
  7. Layer the lasagna:
    • 1/2 cup Veloute
    • 2 noodles
    • 1/2 cup Veloute
    • 1/2 mushroom mixture
    • 2 noodles
    • Remaining Veloute
    • Remaining mushrooms
    • 2 noodles
    • 1/2 pea puree
    • 2 noodles
    • 1/2 pea puree
    • Parsley

7. Cover with foil and bake for 20 minutes. Remove foil and broil until lightly browned. Serve immediately.

bCRW_5929

Sunday, September 02, 2007

Wedding, part 3

Olive Oil. We went through almost a gallon of it. Thank you Costco. And friends Kim and Ian, for shopping with us so that we could use their truck to transport all of this food.

Way back when we first got engaged, Greg and I envisioned a fairly simple wedding. With budget constraints, a certain aversion to excess, and some good hard-headed-stubbornness to always do things with our own hands, we came up with the following ideas: on the beach somewhere, very small, and we'd do the catering ourselves.


We told a few people of our plans, and after hearing some laugh, others furrow their eyebrows, and quite a few say "What? Are you mad?", we completely abandoned the idea of a sit-down reception following ceremony. Our families had never met before and the thought of planning a traditional wedding sent me into increasing throws of grumpiness and bad temper: circumstances called for creativity. We decided that if tradition demanded a fanfare-filled, indecently priced, and short-lived event, we'd throw tradition to the wind and get married
our way. We had a mostly private ceremony with our immediate families in Italy, and then three months later we threw a celebratory bash for our friends and the rest of our family.


Whether I love food or food loves me, or food equals love to me, I knew that our reception would be centered around food we had lovingly prepared ourselves. The last two days have been a hectic rush of culinary preparation, but I think I feel confident in saying that it worked beautifully. For my own reference mostly, I wrote down the full menu at the bottom of this post, along with a few vaguely written recipes that others might enjoy. The food was great and designed to remind us of the three weeks we spent in Italy. Of course, we made far too much for anybody to eat in a single evening. Even after having most of our guests leave with plates full of leftovers, we still have a fridge stocked with yummy bites for a minimum week's worth of snacking. There are a few things we won't be able to finish off, but I plan to make the savory items into ravioli for freezing, and any remaining bruschetta topping will be great as a fresh pasta sauce. The four cheese lasagna, as we figured after our trial run, was a huge hit. The second most popular dish were the vegan meatballs - very funny, since there were only 4 vegetarians in the whole place, and many of the meat-eaters were shocked to discover that they weren't eating meat at all.


It was a truly wonderful evening. I was so busy that I didn't get a single picture of any of it, but my dad was diligent in snapping pictures every few minutes so we will have a record of the night after all. We invited 150 people, 66 RSVP'd yes, and I'd say somewhere around 50 showed up. We brought in houseplants and little white globe lights, every pitcher and serving utensil we owned, along with big sheets of white butcher paper for covering the tables in true Italian style. Greg's mom made flower arrangements from the weeds in our front yard, and my parents patiently assembled caprese salad skewers until the Italian flag colors of red (tomato), white (mozz), and green (basil) were imprinted in their minds forever. Greg grilled until midnight on Friday, and I made 24 cups of bechemel at 8am on Saturday. My father-in-law fussed over the exact seasoning on his salt cod bakala until it was spicy and perfect, and my aunt, uncle and cousin stuffed favor bags full of photos, and chocolate covered raisins and espresso beans. It was an adventure, to be sure, but I wouldn't trade the memories for the world.


The best part? We were able to see everybody in one room. I can't help but be nostalgic about putting away the wedding dress and sad to remove theknot.com from my bookmark list, but I am filled with happiness to know how many of our friends and family were in one room on one night, sharing laughter and some four cheese lasagna. Being among so many individuals that are important to me, I couldn't escape a feeling of gratitude for all of the fortune in my life. Our love of family and friends is what our wedding has been about.


Greg and I wrote our vows in secret and recited them to each other for the first time on May 21st. I called him my "biggest surprise" and he called me his "greatest success". Even in the three months that we have been married, I see our relationship move forward in ways that I shouldn't really be surprised about after all. Saturday night cemented that bond for me. When I glanced his eye from across the room, or found myself helpless with laughter at stories of Greg's childhood, I was reminded again of how lucky I am to be with such a tremendously talented, generous and loving person. I've said it before in this blog and I'll say it again: thanks, Greg. Love you.


I won't tell you how much the Costco bill came to, but let me just say I'd like to shred my credit card right now. One of the best things I did to prepare for this was to break things down in two ways: (1) by ingredient category (dry goods, canned goods, dairy, fruit, etc), and (2) by recipe in basic steps.


6:30-7:30, Appetizers
  • Fruit Platter (cantaloupes, red and and green grapes, Asian pears, oranges)
  • 120 Crabcakes (Prepared by friend Stacey) with Lemon Aoili Dip
  • 100 Lox Bites
  • Cheese Platter (Prepared by friends Kim and Ian)
  • Cracker Assortment
  • Green and Black Olives
7:30-8:30, Main Dishes
  • 120 Vegan Meatballs in Sauce
  • 6 9x13" pans Four Cheese Lasagna
  • 120 Caprese Salad Skewers
  • 9lb Grilled Marinated Shrimp
  • Caesar Salad (Prepared by my Sister-in-law)
  • 4 9x9" Spinach Tart
  • Grilled Vegetables: 10 Eggplants, 15 Zucchini, 2 each of Red, Yellow and Orange Bell Peppers
  • 10 Loafs of Ciabaso Bread, with Olive Oil
  • 4 Bruschetta Toppings: Tomato/Basil/Garlic, Caramelized Onion/Garlic, Pesto, and Olive Tapenade
  • Salt Cod Bakala (prepared by my Father-in-law)
8:30-9:30, Dessert (prepared by my Mother-in-law)
  • 100 Frosted Cupcakes
  • Chocolate Cookies
  • Almond Cookies
  • Brownie Bites
The Booze: 100 Peroni, 20 bottles red wine, 20 bottles white wine, 15 bottles champagne


Spinach Tart
My mom's recipe. One of the few things she cooks (she is a self-admitted "food assembler", meaning that she assembles frozen vegetables and main course items into microwave dishes), and it is excellent and easy. Her version includes some sauteed mushrooms and jack cheese, but I prefer just the spinach.
Serves: 6-8


9" pie crust
16 oz frozen chopped spinach, defrosted and thoroughly squeezed to remove all traces of water
1/2 pt whipping cream
3 eggs
Salt, pepper and nutmeg
  1. If using frozen pie crust, place in fridge the night before to defrost. Place on counter one hour before prepping
  2. Preheat the oven to 350. Thoroughly butter a removable bottom tart pan and drape with pastry. Press pastry into all corners of the pan and sprinkle with several pinches of kosher salt. Chill for 10 minutes, and then bake until cooked through (depending on crust thickness, 5-10 minutes).
  3. Meanwhile, stir together remaining ingredients. Add salt and pepper to taste* with a dash of nutmeg.
  4. Pour filling into tart pan, and bake until set in middle, about 25 minutes.
*This will take a lot of salt and I am sorry to say that I'm just bad at measuring. The only way to check the seasoning, if you are averse to raw egg, is to microwave small bits until they cook through.


Grilled Vegetables

Eggplant, or other firm-fleshed vegetable
Equal parts olive oil and balsamic
Salt and Pepper
  1. Slice eggplant (or other vegetable) to 1/2" thickness (a mandoline helps).
  2. Marinate overnight with equal parts oil and balsamic vinegar
  3. Grill the next day, seasoning each side well with salt and pepper

Four Cheese Lasagna

(Click link for recipe)


Caramelized Onion/Garlic Bruschetta Topping

Olive Oil
2 large yellow or sweet onions
1 head garlic
Salt and Pepper to taste

  1. Preheat oven to 350 degrees. Start a heavy bottom pan warming on stovetop with olive oil to coat
  2. Slice garlic in half. Brush cut sides with generous amounts of olive oil. Wrap, cut sides up, in silver foil and bake for 45-60 minutes, until cloves have steamed through and begun to caramelize (wait for them to turn a golden color. They'll get very sticky when they're done!). Squeeze out garlic cloves into a small dish and set aside.
  3. Slice onions to 1/8-1/4" thick rings. Add to warm pan and stir to coat with olive oil. Turn heat to medium-low and watch onions carefully, continuously stirring so that they evenly brown without sticking. It will take 30-40 minutes for them to reach a golden color, and you can add more olive oil if things get dry.
  4. Puree onion mixture with garlic in food processor until smooth. Salt and pepper to taste (it will take a lot of salt)


Lox Bites

Assemble the following on small crostini round: 1/8" slice of cucumber, slice of lox, 1/2 tsp softened cream cheese and sprig of dill


Caprese Salad Skewers

Marinate small mozzarella balls in Italian seasonings, garlic and olive oil at least overnight. Slide the following onto each skewer: 1-2 grape tomatoes, basil leaf, mozzarella ball, and slice of proscuitto. Drizzle with olive oil.


We kept our to-do list on the fridge. Each little paper was a dish, and it actually helped things stay super organized.